Trigonometry For Children

Devblog # 4

Dair Deary (spelling?),

The last two weeks have been a real challenge. I had finally moved into actually programming this darn game. Before that it was a lot of notes on paper or sketches/experiments in photoshop. Since I know very little about programming and I’m learning as I go I’m relying a lot on guides and tutorials and a million bookmarks of the engine manual. Unfortunately for me there are not very many tutorials, if any, for creating a 2D oblique perspective game. So I’m combining a lot of tutorials for top-down and isometric games.

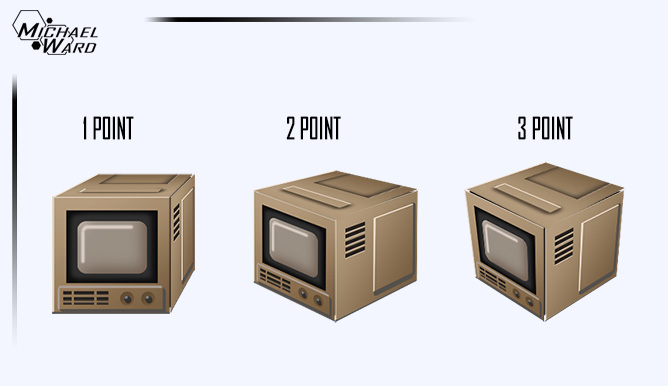
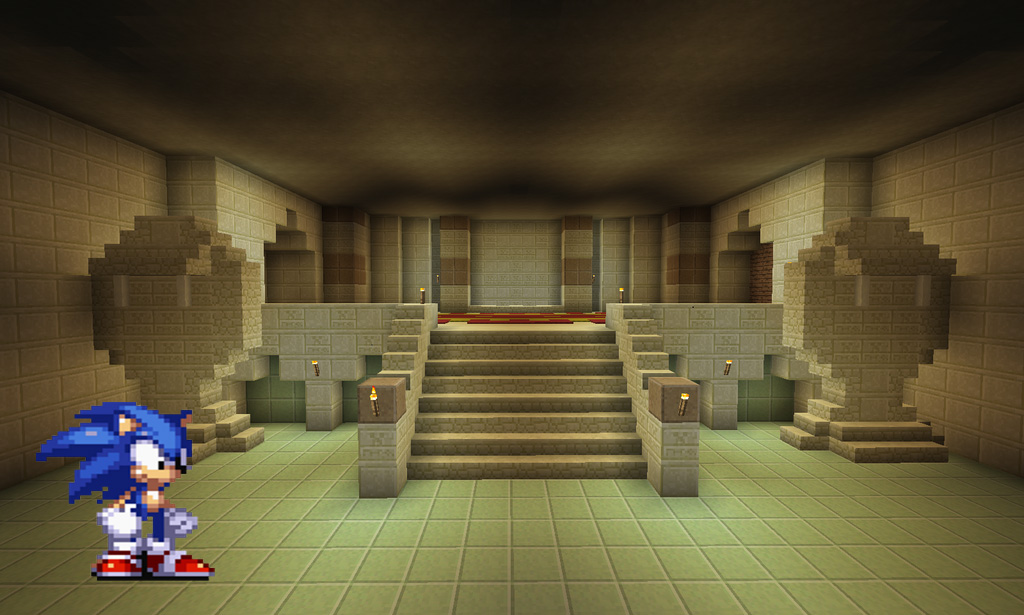
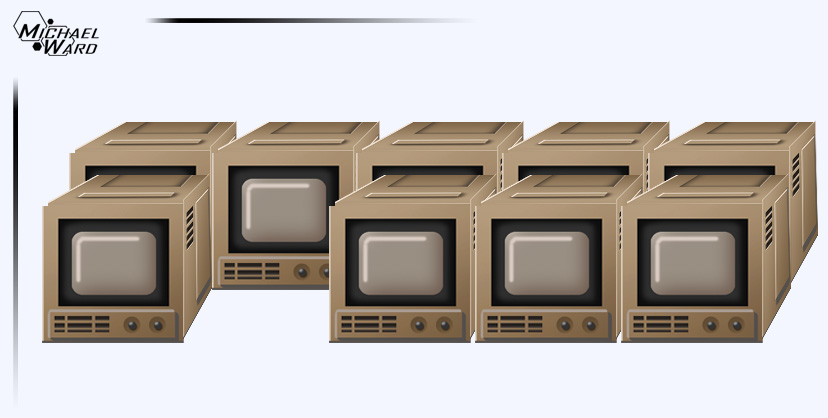
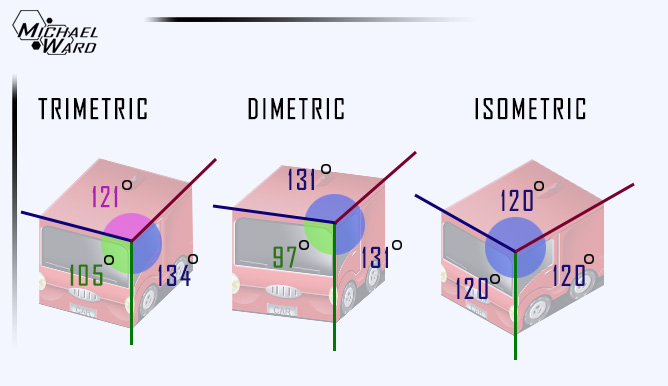
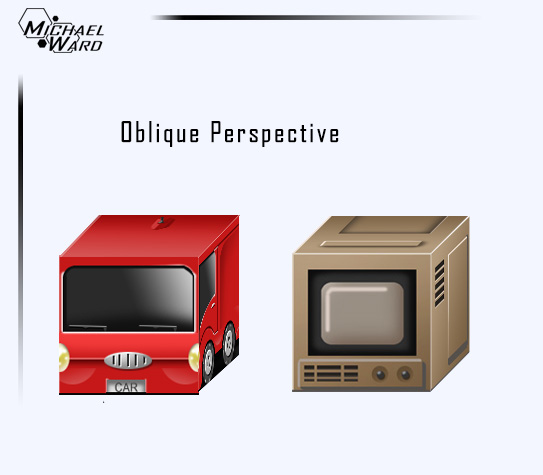
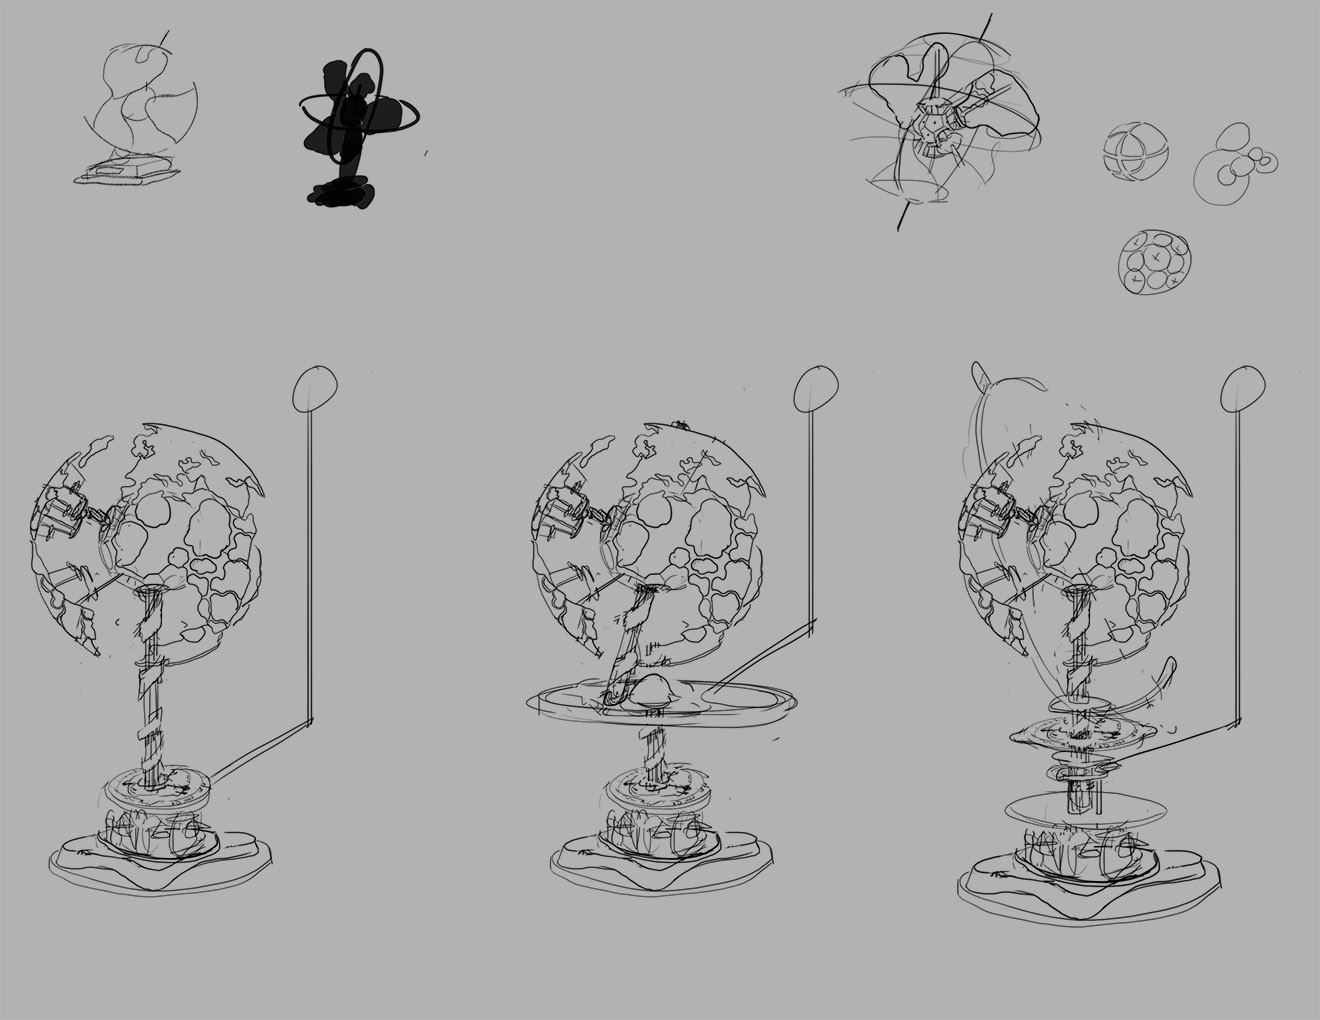
Right now I’m racing to a point where I can actually show progress in game. Actual video game stuff. I needed to program how the game runs first. It’s a completely 2D game but it will look 3D(ish). You can walk left and right and away and towards. You can walk in front of objects and behind objects. As a quick visual experiment to make sure my chosen perspective works I drew this:

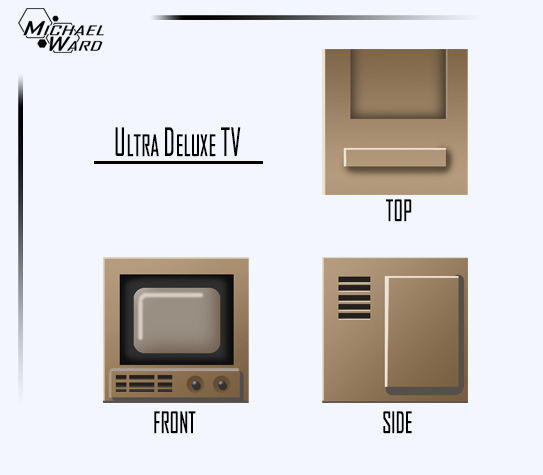
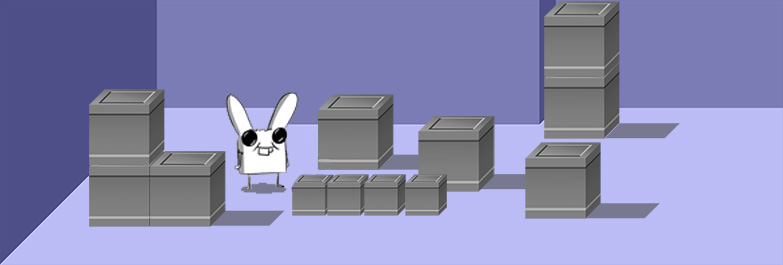
The rabbit you should recognize from some random comics I’ve drawn. He’s almost certainly not going to be in the game. But you can see my intended goal as far as setting up a scene. In order to make the character walk AROUND the objects but not THROUGH the objects I needed to set up collisions for the ground under the cubes. In order to do that I needed to break down the object and tackle each part separately.

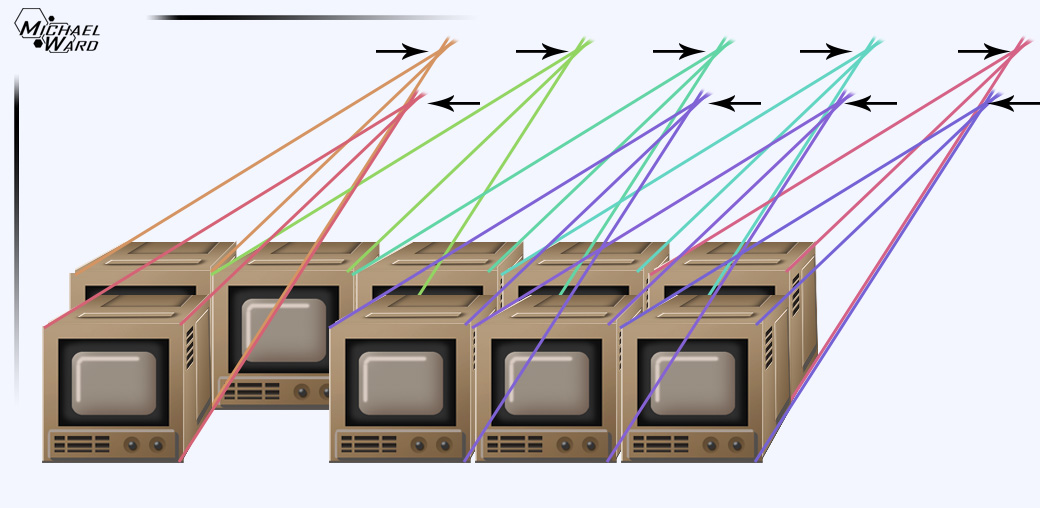
The game engine allows you to create a rectangular “collision mask” for sprites that use very little CPU power. It’s only tracking 4 points in space (the corners of a box). Unfortunately this does not include angles.

I needed to program in a new collision area for every object and I wanted it to be very low cost to the CPU. Fortunately I got lucky because I chose a 45 degree angle for the side perspective. Using the very simple formula for perfect right angle triangles I simply took the side dimension of our collision mask and extended outwards from the top right corner and bottom left corners. This created a new area that I can track.

Now to find out if my character is in fact inside of that area I used the “Point in Triangle” formula. It’s a way of finding out if any given point is inside a triangle by measuring the combined areas it makes. If a point is INSIDE a triangle the area stays the same. If the point is OUTSIDE a triangle the areas get larger. (I’m a math junky and it’s so awesome being able to use these formulas in real life now).

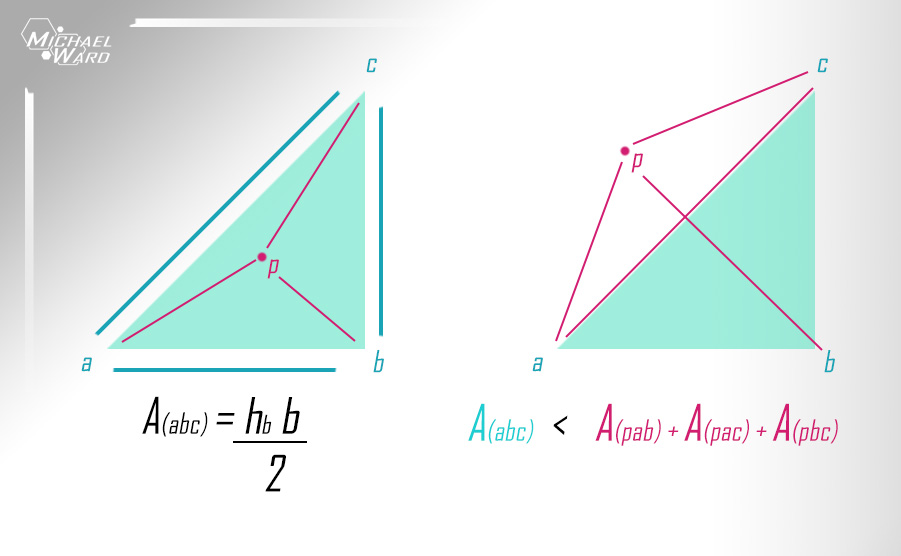
Yes you can use the formula of A = ab / 2 for the first triangle but since you can’t for the other three I didn’t put it in the picture. The silly thing is that I was half way through coding these formulas into the game when I found out that I can use a command literally called “rectangle_in_triangle” which did all the math for me. I just needed to set up the original coordinates of the triangle points and player bounding box. Really saved me a lot of time. Well not really. I had done most of the math already…

There was still one small glitch though. As it turns out the “Rectangle” actually doesn’t trigger when it hits the “triangle”. It only does if one of the corners meets the triangle. Effectively it was doing 4 “point in triangle” calculations.  So to compensate for it I use a “point_in_rectangle” using the furthest point of the triangles and the players bounding box. I’d made a graphic for it but I’m tired and can’t be bothered. If anyone out there ever actually does follow what I’m doing they can ask me to clarify if they don’t already get it.

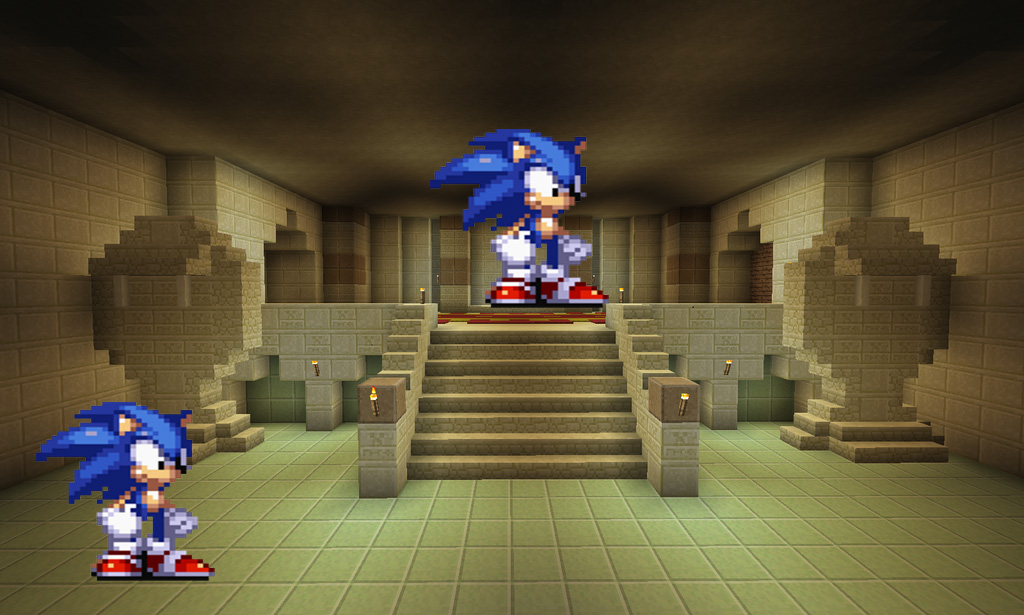
I spent days. Maybe weeks. working on this. I could recreate it now in a matter of minutes but with only a basic grasp of how to program what I’m thinking the smallest mistake can cost me hours while I try to diagnose the problem. In order to really know I had to finish another issue I had. The depth of objects. When objects or characters move around they need to be shown behind or in front of objects depending on the situation.

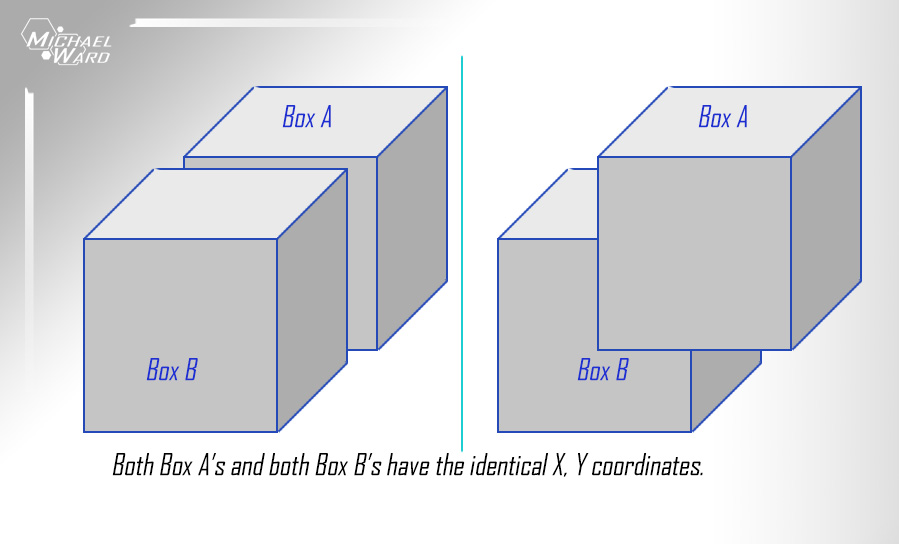
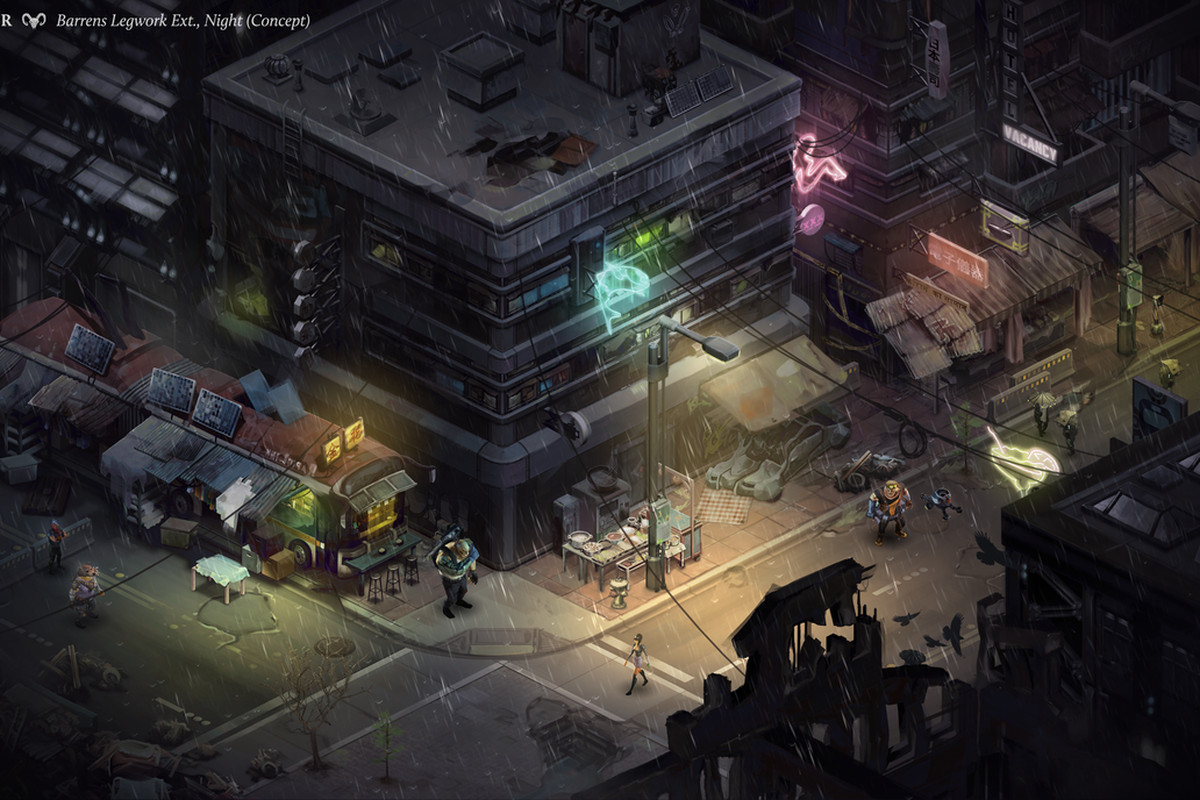
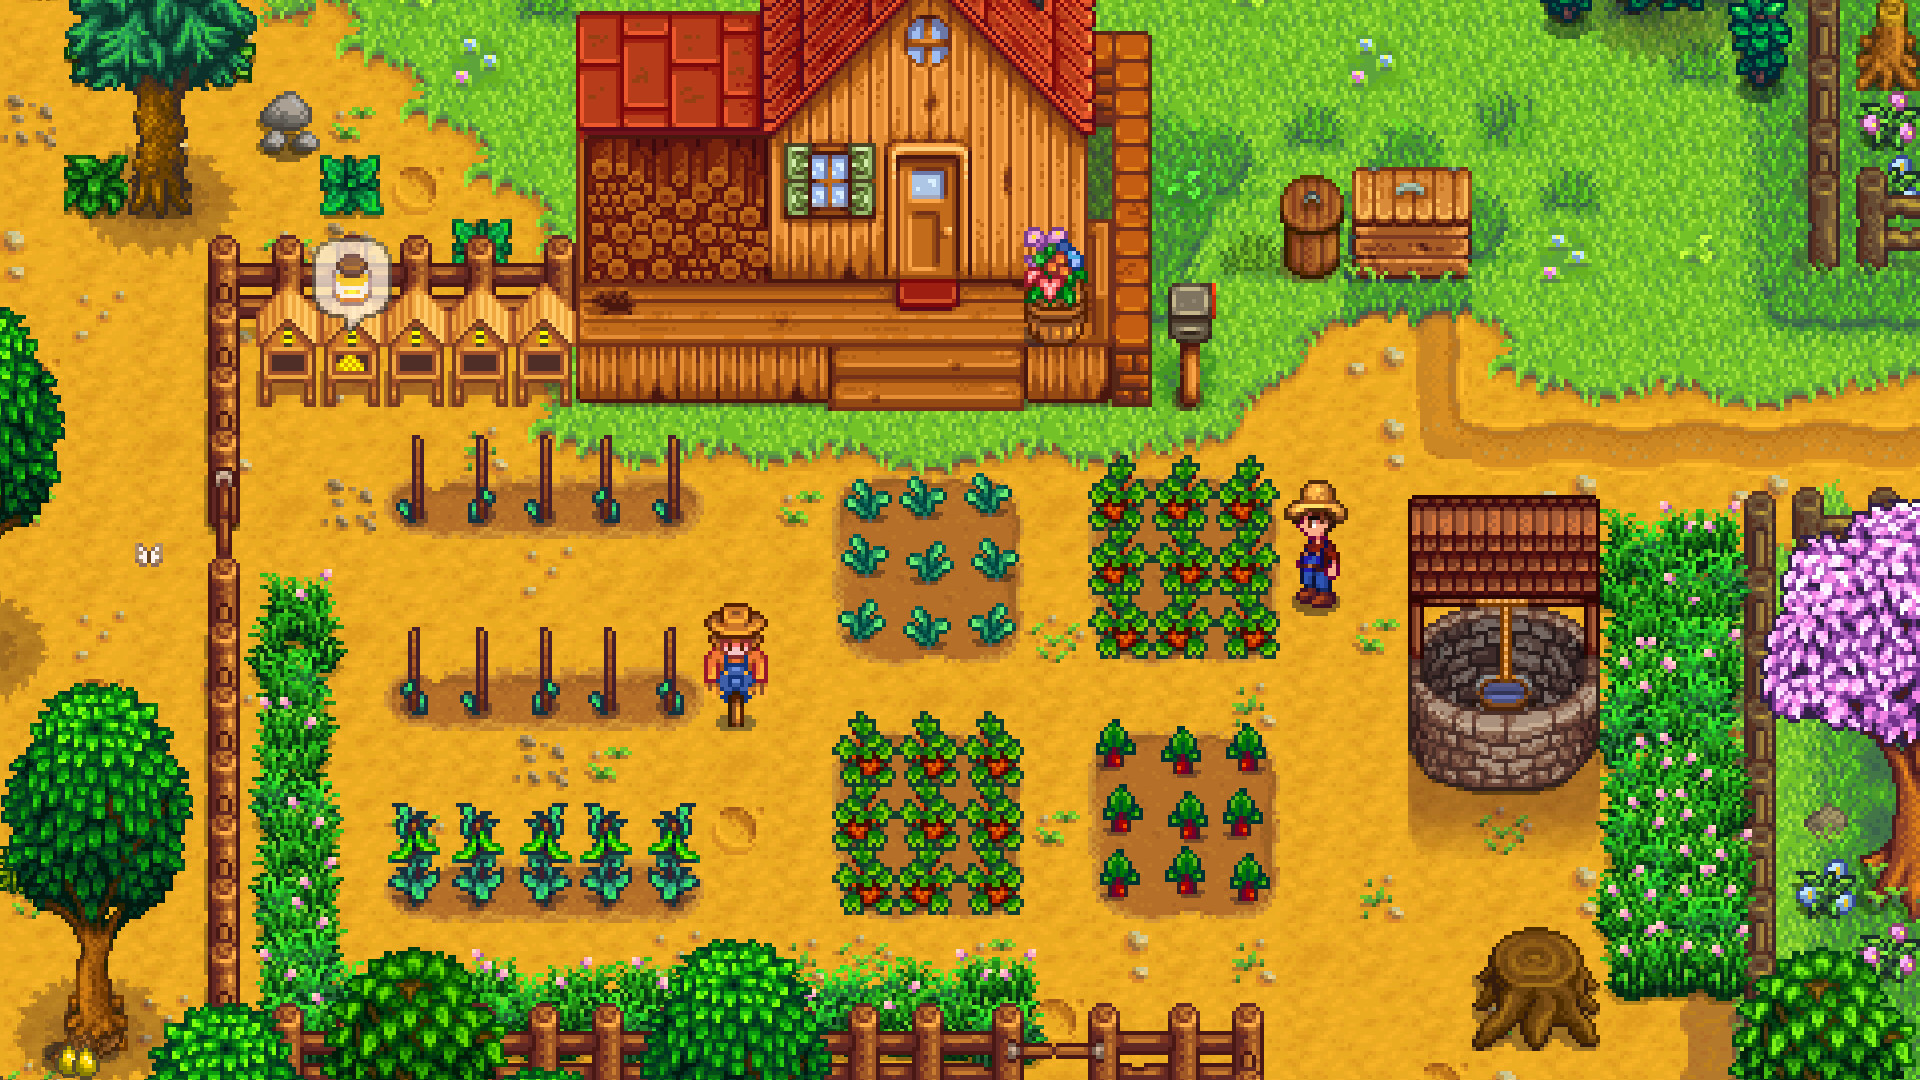
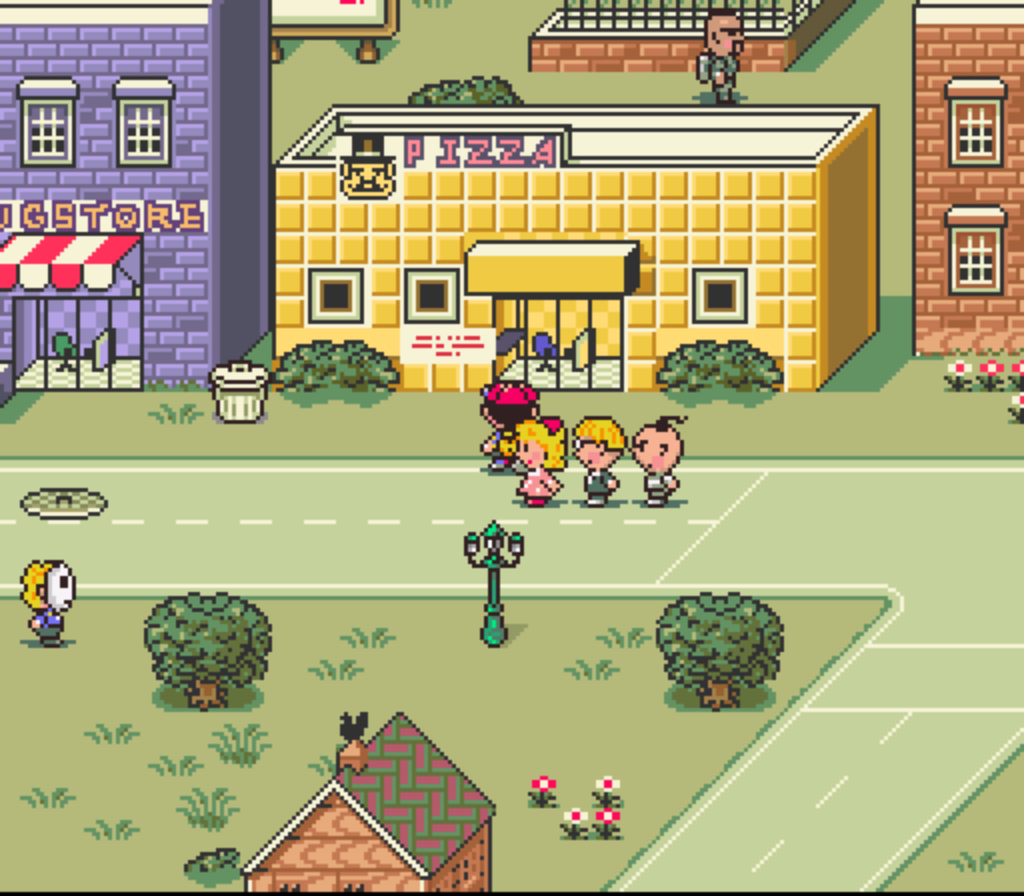
I followed an awesome guide from Friendly Cosmonaut to create a grid that will load all objects with a lower Y coordinate first and higher numbers after. This puts them in the correct order going down the screen. This works for most RPG type games like Stardew Valley or Final Fantasy because you don’t see any of the sides of the box.

So close. I went searching for a solution but I wasn’t quickly able to find one. People asked similar questions about how to order all the X coordinates before moving to the next Y coordinate and some of the answers they got were complicated and heavy. For mine I just simply added a ZERO to the end of the Y coordinate for each object and added the X coordinate. So now instead of 15 objects having an identical Y coordinate (ex 1). Then they each get their own like 11, 12, 13 -> (all 15 objects) before moving to the next Y coordinate to find new boxes.

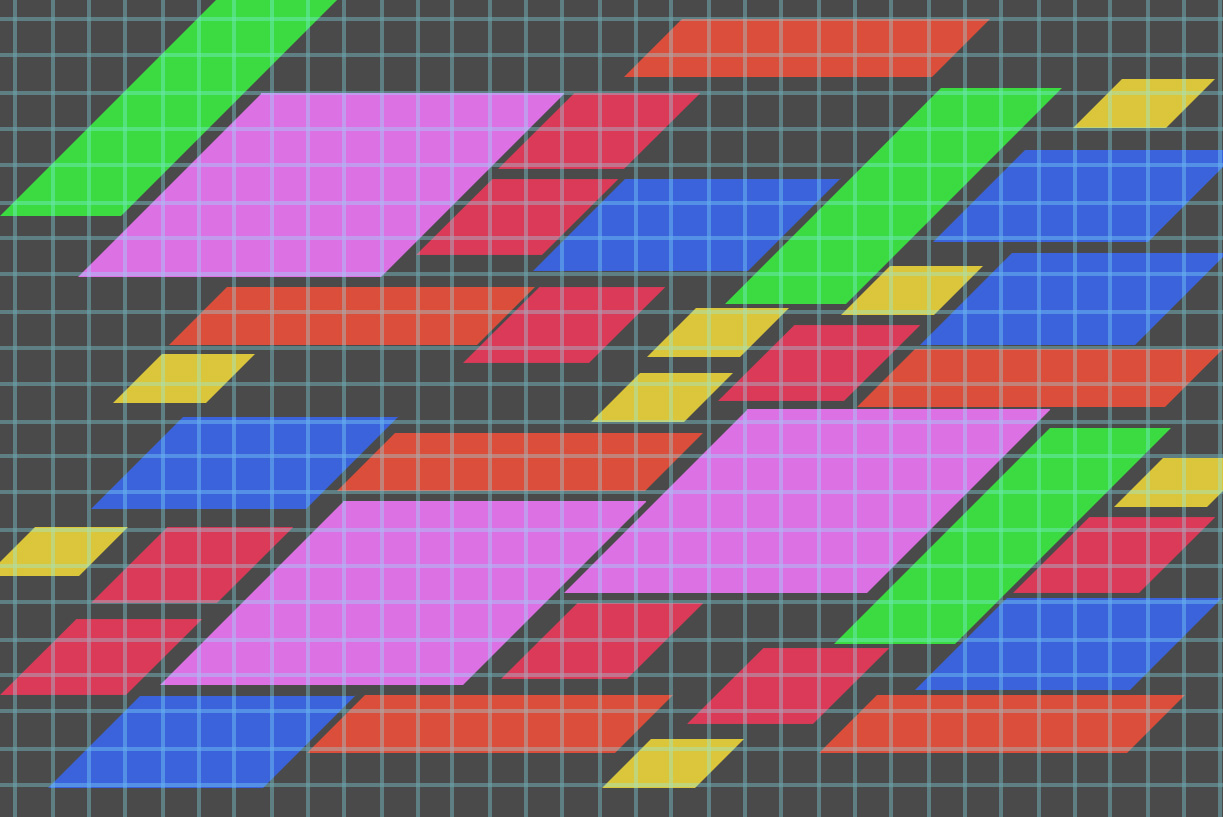
Long story short it worked like a dream. For a few minutes before I found ANOTHER problem. This works great for objects that have the same size footprint. And with a very small modification I made it work for longer items. But items that reach forward and back completely break it. Here’s a grid I created in photoshop with a bunch of different sized and shaped 45 degree parallelograms (the shape my boxes make in the end).

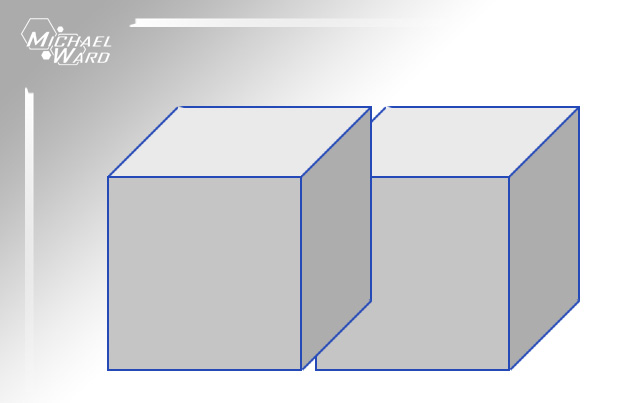
I have dozens of pictures like this from experimenting. It’s ridiculous. If all the objects loaded in the way I needed it to this grid would create a scene like this:

But the largest boxes that extend backwards and forwards the most mess it all up. I haven’t yet come up with a formula that will correct that for me. I’ve had a few experiments come close but nothing perfect. For now I’ll have to just cut up large sprites into multiple objects or tiles so I can continue on with my game. My google searches have just about convinced me that a one-line formula is not likely to fix this. A solution in javascript I found was 200 lines of code and I have no idea how to start using it. I’ll have to come back to it.

But now I’m excited because I can finally start producing assets and show off what this game actually is. I’M SO CLOSE!

Love Michael

A Matter Of Perspective

Devblog #3: (THIS POST IS UNNECESSARILY TECHNICAL BECAUSE I CAN’T HELP MYSELF!111capslock!!1!1one!)

Soooo Diary,

Remember a long time ago (literally the last post… 5 days ago) when I said there are two games I wanted to make but I’ll make the one I’m least excited about because reasons? Ignore all that. I had a lot of people (nearly 4) message me after I posted it and they made me realize that I’m thinking to much. Who cares if the game is harder and will take longer? Life is too short not to be excited about what you’re working on.

Immediately after I decided to change games I had a new problem. What PERSPECTIVE do I make the game? Here’s some important points about the game:

  • The game is 2D.
  • You can explore large areas.
  • You can arrange items/furniture/objects on the ground.
  • I dislike Top-Down video games (with some exceptions).

Most people understand a little bit about perspective. Especially artists. But what a lot of people don’t realize is that Perspective Projection can make the same object look very, yet barely perceptively, different in specific situations. And each has it’s use. Let’s get more specific. I’ve drawn 3 sides of a super modern and sexy TV.

So lets put our TV together.

What happened? There’s 3 of them already? Yup. The same TV (cube) drawn in 1, 2 and 3 point perspective.

For the people that don’t know it’s related to where the vanishing points are:

Technically the way we see in real life is 3 point perspective. But 1 and 2 point perspective are used more often in art. I’m partial to 2 point, myself. So if I like 2 point so much why don’t I just make my game using that? The issue is because objects appear smaller the closer they get to the vanishing point.

That’s fine for all the level assets but not for the character sprite. Here’s a screenshot from Minecraft by artist Kerian-Halcyon that is in nearly perfect 1 point perspective. I put a 2D sprite of Sonic the Hedgehog to show you how he would look standing at the front. Everything seems to be ok.

Now what if Sonic decides to walk to the back of the temple (closer to the vanishing point)? The temple blocks get smaller but Sonic, because he’s a 2-Dimensional sprite, stays the same size. This makes him appear huge!

Those two are the same exact sprite and same 420px tall. For a 3D character in a 3D world we would see him get smaller but for my purposes that just doesn’t work. And yes, technically I could program the game to scale the sprite as he moves backwards but the cons outweigh the pros doing that. At least for my game.

And here is another ‘challenge’. If I make an object like, say, a sexy Ultra High Def TV and I want to put 9 of them in a line using the same sprite here’s how it will look:

That is one fugly lineup (of gorgeous TV’s). Every TV is pointing towards different vanishing points and that’s just not right. See?

This is how it ‘should’ actually look in 1 point perspective:

If I wanted to add this TV to my game I would need to redraw it from every different angle depending on where in the room it’s located. Neither 1, 2 or 3 point perspective will work. Now we need to start getting into Parallel Projection perspectives!

(I can’t believe this post is this long already and I haven’t even started Parallel Projection yet. I thought I’d make like 3 pictures total for this post and I’m already up to (counting 1,2….3……) 9 pictures!)

Since I’m tired of using the Sexiest TV Ever let’s try something a little more normal. Like this car!

No YOU’RE the stupidest drawing you’ve ever seen. Ha. Burned. (I should mention that I’ve done everything so far with just my mouse because my tablet pen is all the way over there). And this is how they look drawn in Orthographic Trimetric, Dimetric and Isometric perspective. Collectively these are called Axonometric projections.

I know I know. They look the same as the first TV picture in 1st, 2nd and 3rd perspective. I told you the changes are subtle. But the impact is hoooooge (at least for what I’m doing). The difference in these pictures is that there are no vanishing points. All lines run parallel:

“If none of the parallel perspectives have vanishing points then what makes them different?”
Excellent question, imaginary student. It’s the angles that the lines are drawn on. Trimetric has 3 different angles, dimetric has 2 and isometric has 1.

Lots of 2D artists (especially pixel artists) will be familiar with Isometric. It’s the most common axonometric because it’s easy to understand just one angle and because it doesn’t favour any particular dimension. This is a screenshot of Shadowrun Returns done really impressively in isometric.

Lots of theory so far. Let’s see why axonometric perspectives are effective. Look what happens when I put them in a line.

SUPER STACKABLE! By choosing one orthographic projection I can make assets in any order and stack them together anywhere in a room and they will look ok. Which one should I choose? My favourite is Dimetric because it favours one side over the others. This would let me put more details where it matters like the front of buildings, etc. So I’m done? It’s settled?

NOPE! I’m not choosing any of these! Let’s dig deeper. (I can hear you all groaning and I don’t care. My devblog my rules. Or lord I’m up to 15 pictures already).

Hey the TV is back. This is a very common perspective used in classic 2D RPG’s. All lines are parallel at 90 degree angles and you don’t see any of the sides. This effect is used to great effect in Stardew Valley.

Stardew Valley is an important game in the Social Simulation and Farming RPG genres which my game will be taking quite a bit of inspiration from. And the 3/4 perspective is effective but it’s just not what I want for my game. I feel like you are looking at the word through a telescope. Being able to survey your entire farm at a glance is nice but the trade off is small details.

Now finally here is the perspective I’ve decided on! (Only took me two days to write this post plus 2 months of thinking about perspectives to narrow it down). Oblique Projection.

Also called Cabinet Perspective because it’s often used in cabinet schematic drawings. Here are the benefits.

  • You see 3 sides (more details)
  • No vanishing point means they can be stacked and moved anywhere.
  • You see 100% of the front side without any distortion. The front of the car and TV is facing us completely as a perfect square.

The whole point of making my own game is really to flex my artistic muscles. Learning programing/design/writing/publishing/PR/etc is just a side effect. I’m all about the art. Upcoming Beat-Em-Up Raging Justice is done in this perspective and just look at these graphics. So many graphics.

It’s a common perspective used in Brawler games and I thought about trying it for my game a few days ago. But I wasn’t completely sure it would be viable. Brawlers let you walk left, right, up and down but you really don’t go that far into the background. But I found a game that actually used oblique projection really well. A really old game. Earthbound!

You don’t even know how excited I was to find out such a beloved game used this perspective so successfully. Just imagine that game with the graphics of Raging Justice. That’s my goal. is it doable? Hahahaha. HAHAHAHA. I don’t know. Maybe?

So there you have it. But before you go let me show you an easy photoshop trick to fake your way into drawing something in 3D using flat 2D pictures and the Transform > Distort tool.

I know this whole post was completely unnecessary for me to say “Hey guys I’m gonna make my game in oblique perspective”. That isn’t even a whole tweet. And I don’t know who I’m trying to teach with all this. But one day I could be an art teacher or do a GDC talk so it’s good practice. Maybe it’ll actually help somebody??

Also there are other perspective projections I didn’t cover. You can read these two articles if you want to know more about game perspectives. Here and Here.

Love Michael

Am I Working On The Right Game?

Devblog #2:

Well Diary,
I’m stumped. I don’t know what video game to make. It’s not that I can’t think of an idea, either. I have TONS of ideas. And I’ve been working on them. Ok let me start over:

A few months ago when I decided to make a video game I had 3 or 4 pretty decent ideas for what it could be. However I had never programmed anything in my life. But the start of any project like this happens on paper anyway so I just wrote all my ideas down. My goal is not just to create one video game. I want a lifetime of video games behind me. So it all went into the notebook.

I sorted all my games from easiest to make to hardest. Keeping in mind that I really didn’t know much about programming so it was really guess work. I started work on the easiest game. It was going to be the game I used to learn programming as well as everything else that goes into making a game company (PR, publishing, testing, etc). And hopefully help bankroll the second game. Let’s call the first one Game Apple (since I’ve no idea what I’m naming it).

(Yes I photoshopped a gameboy apple just for this post. I hate posts that don’t have any pictures and it’s all I could think of. No I’m not making fruit based electronics).

Game Apple is a game that I’m excited to make because of a fairly unique (in my opinion) twist on a common mechanic and for the story/environment. But I worry a little about it being commercially viable. I ‘believe’ there will be an audience for it. But like all creators I hope my creation will be loved by millions. But years of posting art online shows me that an audience is hard to grow.

The hardest game on my list, Game Banana, is large and the story and mechanics seemed complex BUT I believe it will have a larger audience. A MUCH larger audience. Assuming it’s done correctly, that is. The game I have in my head may be too hard for me to make.

But as I worked on Game Apple I started to understand more and more about the programming language as well as conventions like functions and arrays that can really speed up complicated blocks of code. The more I’m learning the more I’m realizing that Game Banana may not be as impossible as it seemed. Yes, it will be harder. And yes I’m very early in my ‘career’ and I may still not know what I’m talking about. But I’m confident that I could ‘start’ Game Banana now.

The more I learn while making Game Apple the more I day dream about what Game Banana could be and I wonder… am I working on the right game? Do I truly need to spend a year working on a game I’m less confident in before starting a game that could start my company?

This is something I’ve been struggling with internally for months. Sometimes I’ll stare at the wall unknowingly just to have Becky (my wife) ask me what’s wrong. We usually laugh when I respond with “oh. video game stuff.” in my saddest voice.

I think I’ve come up with an answer however:

I Need To Work on Game APPLE. Game Apple ‘should’ be much easier to make. Meaning I will be able to spend more time learning how to do all the other things related to making a video game aside from programming and art. I want to make professional quality games and I’m going to make Game Apple the best game it can possibly be.

I always say “I’d rather be on the first rung of a ladder I want to climb than the top of a ladder I don’t want to be on.” This was the analogy my mom and I used when I decided to change careers into Video Game Concept Art after spending my entire adult life doing something else. Maybe I shouldn’t consider Game Apple and Game Banana two different ladders. Maybe I should stop writing and get to work.

Michael


I’m A GameDev!

Devblog Day 1:

Guess what, Diary.

I’m a gamedev!
Yup. In the sense that I’m making / learning how to make a video game. I have been for quite a few months but I’ve kept it super secret. Well not really. Kind of secret. But now the cats out of the bag for one very simple reason:

I NEED PEOPLE TO YELL AT ME WHEN I DON’T WORK ON IT!

(I don’t know why I never use capslock when I write like that. I always just keep shift held).
I’ve watched hundreds of hours of GDC videos  and read dozens of articles about how to not fail while making an indie game and the number one suggestion is “Don’t Keep It Secret”. Telling people (especially people that give a darn) will keep you motivated. Not only because (hopefully) those people will be excited to see what you’re producing, but also because they’ll remind you when you’re slacking off.

For instance:
I have done ZERO work on my game for three weeks. Also I bought Monster Hunter World three weeks ago. Coincidence? maybe…

(It is so NOT a coincidence. Also, I main Insect Glaive. It’s awesome.)

So I’m going to try to talk lots about this game while I make it. Blog posts, tweets, facebook, instagram, etc. Maybe youtube videos?? If you REALLY care about what I’m up to I recommend Twitter since it’s where I’m the most active. I don’t know if I’ll make a website for the game or my ‘company’ or what. And if so, I don’t know if I’ll move this devblog over there. But for now I’ll only worry about the game and keep everything here on my portfolio website.

OH! Also I will occasionally be making comics about it. Because it’s a nice distraction and stick figures are super quick to draw. Plus comics. I mean come on. Comics.

Love Michael

Glamour Shot

I’ve been reading guides to get myself employed as an artist and most of them suggested a good picture of me for a linkedin profile and my portfolio. So here it is.

It’s so heavily edited that it looks painted. Haha. It was a low res shot taken from an old webcam in my basement. I erased the background, added highlights to any of the high wrinkles on my shirt and redrew in the hair with a hard brush. I don’t know. I think it came out ok. Took about an hour to edit.

I put it on as my twitter profile but I HAD to change it. I don’t know how people can stand looking at themselves in their avatars all day. Here’s the new twitter profile:

Better.

Love Michael

New Portfolio

I graduated from the Diploma Concept Art class at the Vancouver Animation School a few weeks ago!


Are you proud? Yeah you are.

It’s been several months since I updated the website/blog mostly because the workload of school plus the workload at work was so crazy. I couldn’t afford to lose an hour every couple of dates to update since I was struggling to keep up with the assignments.

But in the end I prevailed! To be honest I’m really going to miss the program and my teachers. It was tough at the end, sure, but they really really pushed me to do better. Here is a comparison to really show progress. The first two images I drew the month before school started. The last two were my final assignments.

I hope the level of advancement is as obvious to you as it is to me.

If you read the last post about me adding the comics you can ignore it now. I’ve removed all the individual comic posts because they were breaking the website. 300 images gets unruly when you post them the way I did. I’m going to add simple galleries to the site soon for each series. In the mean time I’m going to start applying for CONCEPT ART JOBS!

Michael Ward

Website Update – Adding Comics

I haven’t updated in a couple of weeks as I work on some new assignments but I’m also doing the HUGE task of adding ALL MY OLD WEBCOMICS to this site! Yay! And some new ones! Lots of new links and descriptions and stuff coming. Right now it’s all dead links and missing information.

Lately I’ve been drawing a lot of comics with ANOTHER BLEEDIN’ BUNNY! I know. I’m the worst. But bunnies are sooooo great for drawing. You can see all the ones I’ve drawn on my Tumbling-er or my Instant-grahams or my Tweeters or my PhaseBook. But here’s all the ones I’ve drawn so far in case you’re too lazy to click another link.

001

002003004005006007008Comedy gold, right?

Love Michael

Shark Car – End of Term 3

2nd and last post today. But I’m going to get serious for a moment before I get into the art. (No one reads this blog anyway)

Term 3 ended this week and I’m so embarrassed about it. I didn’t even realize that my last class was actually my last class. I was late on EVERY.SINGLE.ASSIGNMENT this term. I kept saying I’d catch up but I never did. I still tried hard with my assignments and I really think I’ve grown but I really missed an opportunity to learn from my teacher, Todd Marshall.

Todd is an amazing artist and he loves to draw dinosaurs and science fiction. Wait a second. ‘I’ like to draw dinosaurs and science fiction! My last to webcomics were about dinosaurs and space ships! But by having all my assignments late, I missed so many opportunities for one-on-one critiques on my images before running out of time to make the necessary corrections. I can’t imagine the knowledge I missed out on. He did his best to fill the class times with tutorials, of course, but it’s not the same as literally fixing my mistakes and teaching me how to prevent them.

But on-to the final assignment. The first paintover that worked for me! Finally I did it! Even my apartment from a few posts ago shouldn’t really count as a paintover since I only sketched over top of it and then never used the original image. This time though I started with a car:

sharkoriginalIsn’t that just the dumbest/greatest thing ever? It looks like an aquarium… which is what I thought when I started sketching. The final sketch ended up like:

sharkcarthumbnail

A fish driving a shark car! Super rad. My assignment was so late that I was practically starting it AFTER my last class with Todd. So when I uploaded the final image, it was the first time he even know what the heck I was drawing. Ugh. Sorry, Todd.

Anyway, the final:
sharkcarThis was a lot of fun to draw. I love cartoony stuff. Can you believe Pixar still hasn’t hired me?

Term 4 starts next week and it’s supposed to have more assignments than the last 3 terms combined. I need to change my habits if I want to pass it.

Michael

Matte Painting – Destroyed Paris

10 days ago, or so, I wrote 7 posts. Today I’m just doing 2. Way easier.

The school tasked me with creating a matte painting. What the heck is a matte painting? Well, it’s the ultra-high def cousin of concept art. And it’s actually pretty amazing. (Do yourself a favor and googled ‘digital matte painting’)

Matte painting serves to fill an environment in film or movies. Like if a character is standing in front of a destroyed town, you can assume the prop makers didn’t actually destroy a town. A matte painter just painted one in the background.

I started with a picture of Paris because I really like that place (I eloped there with my wife!)

matteparisbefore

Then I set about destroying it! I started blending other pictures on top and painting in areas and changing the lighting and junk. I wanted to create a world that was destroyed by a fungus or an insect or something.

These are the images I used to create the scene.
imagesused

And THIS is the final imageparisdestroyedv5How did I do? The ‘eggs’ (or whatever) are actually just moldy blackberries.

What to compare it to the original? Here yah go!
combinedv2And of course… the animated process.
matteanimationMichael

Clockwork Globe

(Last post tonight)

This post is the one I’ve been most looking forward to writing tonight. This is about the image I’m the most proud of ever. Not just during my time in art school.

The assignment was to create a prop. Any prop at all. Big or small or soft or hard or complex or simple. Anything that wasn’t a character, animal, vehicle or weapon, basically.

And just like the rest of the summer; I was way behind on my assignments. I was going to go simple. I failed spectacularly at that. I tasked myself with creating a Clockwork Globe. A planetary globe of Earth that is controlled by gears that would change the plates to show how the continents changed over millennia.

During the thumbnailing stage I didn’t realize how complex this idea is:

thumbnailsJust a few gears and poles poking about but mostly just flat or round smooth surfaces.

During the line art I started to figure out how dumb I was:

globewipI really struggled with the perspective at first and I started over 10+ times. I know for concept art it doesn’t need to be 100% perfect but I wanted this to be done right. Even though I was so late on my assignments and I was currently working 10-12 hour days I just wanted to make this image.

And this is the finished image.

globe50percentI was so late with this image that I had to simplify so much from the line art. The gears at the bottom aren’t nearly as complex as I imagined. The engraving on the wood isn’t there. But I am so happy with this. There are flaws and missed opportunities but so many times while drawing this I started sketching simpler props. I gave up completely on this picture every single night only to wake up ready to fight it more each morning.

And for fun here it is animated:

globeanimFor my next assignment I WILL go simpler.

Michael